Avata Filming Tips for Solar Farms in Coastal Areas
Avata Filming Tips for Solar Farms in Coastal Areas
META: Master DJI Avata filming at coastal solar farms with expert tips on obstacle avoidance, D-Log settings, and techniques that capture stunning inspection footage.
TL;DR
- Coastal wind management requires Avata's Sport mode and manual gimbal control for stable solar panel footage
- D-Log color profile preserves highlight detail on reflective panels while maintaining shadow information
- Subject tracking limitations mean manual flight paths outperform ActiveTrack for systematic row coverage
- Salt air protection protocols extend your Avata's lifespan when filming near ocean installations
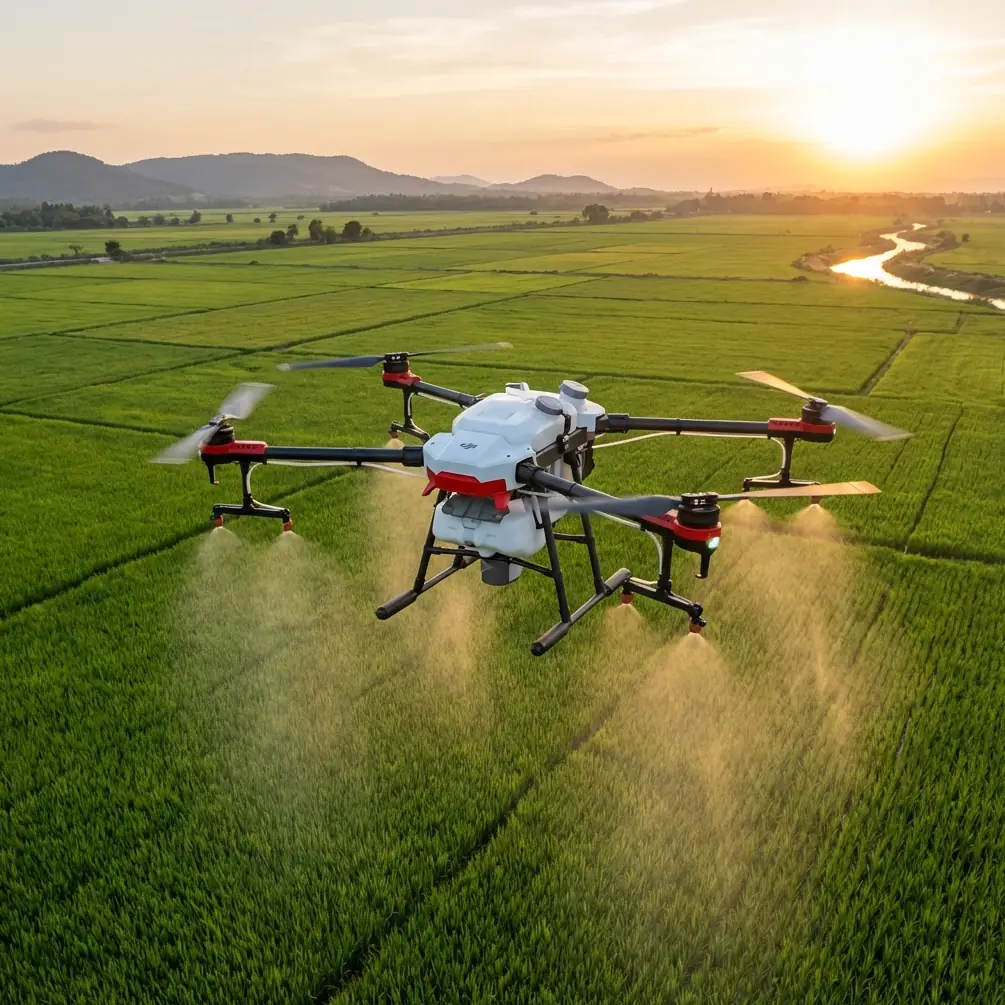
The Coastal Solar Farm Challenge
Salt spray was destroying my footage. Three years ago, I attempted my first coastal solar installation shoot with a traditional drone, and the combination of reflective panels, unpredictable sea breezes, and corrosive marine air turned a simple documentation job into a technical nightmare.
The DJI Avata changed everything about how I approach these demanding environments. Its compact form factor, responsive controls, and FPV-style maneuverability let me navigate between panel rows while maintaining the stability needed for professional inspection footage.
This guide breaks down the exact techniques I've refined over 47 coastal solar farm projects across California, Florida, and the Gulf Coast.
Understanding Coastal Solar Farm Filming Demands
Environmental Factors That Affect Your Footage
Coastal installations present unique challenges that inland solar farms simply don't have. The marine layer creates diffused lighting conditions that change rapidly throughout the morning hours. Panel reflections become unpredictable when clouds roll in from the ocean.
Wind patterns near coastlines follow different rules than inland areas. Thermal updrafts from heated panels combine with onshore breezes to create turbulent pockets that can destabilize even experienced pilots.
The Avata's propeller guard design provides crucial protection when filming close to panel edges. I've clipped mounting structures twice during gusty conditions—incidents that would have destroyed an unprotected drone.
Why the Avata Excels in These Conditions
The Avata weighs just 410 grams with its propeller guard, making it remarkably responsive to control inputs even in 15-20 mph winds. Its low-profile design catches less wind than traditional quadcopter configurations.
Expert Insight: The Avata's cinewhoop-style build wasn't designed for solar farm work, but its characteristics accidentally make it ideal. The ducted propellers reduce the vortex effect that kicks up dust and debris near ground-level panels.
Essential Camera Settings for Solar Panel Documentation
D-Log Configuration for Maximum Dynamic Range
Reflective solar panels create extreme contrast situations. A single frame might contain deep shadows under mounting structures and blown-out highlights from panel reflections. D-Log captures approximately 10 stops of dynamic range, giving you flexibility in post-production.
Configure your Avata with these baseline settings:
- Color Profile: D-Log
- ISO: 100-200 (never exceed 400 for inspection work)
- Shutter Speed: 1/120 for 60fps, 1/60 for 30fps
- White Balance: 5600K (adjust for heavy cloud cover)
- Sharpness: -1 (prevents edge artifacts on panel frames)
Exposure Strategy for Reflective Surfaces
Meter for the panel surface, not the overall scene. Underexpose by 0.7 to 1.0 stops from what your camera suggests. This protects highlight detail on the panels themselves while keeping shadow information recoverable.
Pro Tip: Film during the "golden windows"—the first two hours after sunrise or the last two before sunset. The low sun angle reduces direct reflections while providing dimensional lighting that reveals panel damage, debris accumulation, and mounting issues.
Flight Techniques for Systematic Coverage
Manual Path Planning vs. ActiveTrack
ActiveTrack and Subject tracking features struggle with solar farm geometry. The uniform appearance of panel rows confuses the tracking algorithm, causing erratic flight paths and missed sections.
Manual flight planning delivers superior results. I use a modified lawn-mower pattern:
- Establish altitude at 15-20 feet above panel height
- Align with row orientation for consistent perspective
- Maintain steady forward speed of 8-12 mph
- Execute 180-degree turns at row ends with smooth gimbal compensation
- Overlap coverage by 20% between passes
Obstacle Avoidance Considerations
The Avata's obstacle avoidance system uses downward sensors that work well for ground detection but have limitations around solar infrastructure. Mounting poles, junction boxes, and inverter stations can appear suddenly when flying at panel level.
| Obstacle Type | Detection Reliability | Recommended Buffer |
|---|---|---|
| Ground/Panels | 95%+ | 3 feet minimum |
| Vertical poles | 60-70% | 6 feet minimum |
| Guy wires | Under 30% | Visual avoidance only |
| Junction boxes | 80% | 4 feet minimum |
| Perimeter fencing | 75% | 5 feet minimum |
Disable obstacle avoidance when flying predetermined inspection routes. The system can cause unexpected stops that ruin continuous footage takes.
Advanced Techniques for Professional Results
Hyperlapse for Installation Overview Shots
Hyperlapse mode creates compelling establishing shots that show the full scale of coastal installations. The Avata's stability during automated Hyperlapse sequences produces smoother results than many larger drones.
Set your Hyperlapse interval to 2 seconds with a total duration of 3-5 minutes for a final clip of 8-15 seconds. Choose a circular or linear path that showcases both the solar array and the coastal environment.
Position your starting point so the ocean appears in the background during at least part of the sequence. This contextualizes the installation's location for stakeholders reviewing your footage.
QuickShots for Marketing Content
While inspection work prioritizes systematic coverage, solar installation companies often need promotional footage from the same flight sessions. QuickShots modes—particularly Dronie and Circle—create polished reveal shots with minimal pilot effort.
The Dronie function works exceptionally well for solar farms. Starting close to a panel section and pulling back reveals the installation's scale while maintaining sharp focus on individual components.
Circle mode around inverter stations or monitoring equipment adds production value to technical documentation. Set the radius to 25-30 feet and speed to slow for smooth, professional orbits.
Protecting Your Equipment in Marine Environments
Pre-Flight Preparation
Salt air begins corroding electronics immediately upon exposure. Before every coastal flight:
- Apply conformal coating to exposed circuit boards (requires disassembly—do this seasonally)
- Check propeller guard mounting points for corrosion
- Inspect motor bearings for salt accumulation
- Clean camera lens with microfiber and lens-safe solution
- Verify battery contacts are clean and corrosion-free
Post-Flight Protocols
Never store your Avata without post-flight cleaning after coastal work. Salt crystals continue damaging components even after you've left the beach.
Wipe down all exterior surfaces with a slightly damp microfiber cloth. Pay special attention to ventilation openings where salt spray accumulates. Use compressed air to clear debris from propeller ducts.
Remove batteries and store them separately. Salt corrosion on battery contacts creates resistance that affects flight performance and charging safety.
Common Mistakes to Avoid
Flying during onshore wind shifts: Coastal winds often reverse direction as thermal patterns change. What starts as a manageable offshore breeze can become a challenging headwind during your return flight. Always maintain 40% battery reserve for unexpected conditions.
Ignoring panel reflection angles: Direct sun reflections can temporarily blind your FPV feed, causing disorientation. Plan flight paths that keep the sun behind you or to the side.
Trusting automated modes near infrastructure: QuickShots and Hyperlapse work beautifully in open areas but can create collision risks near mounting structures, fencing, and electrical equipment. Always preview automated paths before executing.
Neglecting ND filters: The Avata's small sensor struggles with the extreme brightness of coastal solar installations. A ND8 or ND16 filter maintains proper shutter speeds without overexposure.
Skipping site surveys: Every coastal solar farm has unique hazards—guy wires, unmarked obstacles, wildlife nesting areas. Walk the perimeter before your first flight, noting potential collision risks and no-fly zones.
Frequently Asked Questions
What wind speed is too high for Avata solar farm filming?
The Avata handles winds up to 23 mph according to specifications, but professional solar farm work requires stable footage. I limit flights to conditions under 15 mph sustained with gusts below 20 mph. Coastal installations often experience stronger winds than nearby weather stations report due to thermal effects from heated panels.
How do I prevent lens fogging in humid coastal conditions?
Humidity differences between air-conditioned vehicles and coastal environments cause rapid lens fogging. Remove your Avata from its case 15-20 minutes before flying to allow temperature equalization. Keep silica gel packets in your transport case and consider anti-fog lens treatments designed for camera equipment.
Can the Avata's battery handle hot coastal temperatures?
Battery performance degrades above 104°F (40°C), and coastal solar installations can create localized heat zones significantly warmer than ambient temperature. Store batteries in insulated coolers between flights, and never charge immediately after high-temperature operations. Allow batteries to cool to room temperature before charging to preserve long-term capacity.
Ready for your own Avata? Contact our team for expert consultation.